VSCode
세로 블럭 다중 선택 (열편집)
https://onesixx.com/vim-vscode/
시작점에 커서 놓고, Shift+Cmd+Option 화살표 (Shift+Ctrl+Alt 화살표)
vim일때,
Visual Block (^+v) 으로 복사할 내용을 yank한후,
원하는 곳에서 paste
한꺼번에 바꾸기
https://young-cow.tistory.com/66
선택 – Cmd+Shift+L – Cmd+D – 수정
멀티 커서
Alt + Click
사이드바 양쪽사용
To display the Secondary side bar, you can:
- Run View: Toggle Secondary Side Bar Visibility (Ctrl+Alt+B).
- Check the View > Appearance > Secondary Side Bar menu item.
단축키
열려 있는 Visual Studio Code 창 사이를 전환 Cmd + `
분할화면 이동 Cmd+ 숫자키 ex) 2분할인 경우 Cmd+1 Cmd+2
그냥 화면이동 Ctrl + 숫자키
모든 줄 끝에 쉼표를 자동으로 추가
바꾸기에서 $ => ,

함수 function관련
함수의 arguemnt 보기 (Quick Info)
IntelliSense 기능을 사용하려면, 함수 안에 커서를 놓고,
Ctrl + Shift + Space
Cmd + Shift + Space
해당 함수의 정의로 가기
F12
마우스우클릭 > go to definition
만들기 (refactoring)
Ctrl+Shift+R
변수, 함수명 수정 (rename symbol)
F2
save paste 시 formatting자동으로

How to set environment variables in vscode
Variables Reference
launch.json(디버깅 환경설정 파일) 만들기
https://velog.io/@markyang92/Python-os
Environment variables#
${env:Name}를 통해서 환경변수를 참조할수 있다.
(예를들어, ${env:USERNAME}).
{
  "type":    "node",
  "request": "launch",
  "name":    "Launch Program",
  "program": "${workspaceFolder}/app.js",
  "cwd":     "${workspaceFolder}",
  "args":     ["${env:USERNAME}"]
}
Configuration variables#
{config:Name} 를 통해서 VS Code settings설정을 참조할 수 있다.
(예를 들어, ${config:editor.fontSize}).
pycham
Edit Configurations…> Environmental variables> click> Add or change variables, then click OK
import os
print(os.environ['SOME_VAR'])
하지만, vscode 의 launch.json 파일의 configuration 에 다음을 넣으면 문제 해결된다.
참고 : Debugging configurations for Python apps in Visual Studio Code
json pretty format

세로선 넣기


ipython notebook 자동스크롤 안될때

Explorer에서 불필요한 폴더/파일 숨기기
python의 경우, __pycache__ 폴더 *.pyc 파일
Code> Preferences > Settings
Setting.json
    "files.exclude": {
        "**/.git": true,
        "**/.svn": true,
        "**/.hg": true,
        "**/CVS": true,
        "**/.DS_Store": true,
        "**/Thumbs.db": true,

        "**/*.pyc": {"when": "$(basename).py"},
        "**/__pycache__":true,
    }

Terminal에서 파일 실행
$ code . some.txt

Vim 클립보드 사용
*p

참고.
https://code.visualstudio.com/docs/python/python-tutorial/
vsCode 설치
miniConda 설치
프로젝트 전체 내에서 문자열 찾기
Cmd + Shift + F
글자크기
- > ctrl + , 폰트 크기를 조절하고 싶다면 font size 라고 설정창에 입력 한 뒤 크기 조절한다.
- > font size. 마우스 스크롤로 글자 크기를 조절하고 싶다면 …
- > zoom.
2. User > Text Editor > Mouse Wheel Zoom (Unckeck)
window.zoomLevel
editor.fontSize.

Extension
visual studio code remote ssh
원격서버에 접속하는 방법
Add New SSH Host 선택 > ssh 계정명@ip주소(또는 도메인) 형식으로 입력> 비밀번호를 입력
자동 접속 설정 (비밀번호 입력 생략)
- 로컬에서 ssh-key 발급
- 발급된 ssh-key파일을 서버에 등록
- config 파일에서 키파일을 인식하도록 설정
1. 로컬에서 ssh-key 발급
PowerShell에서
ssh-key를 발급 (입력부분 모두 3번 엔터)
발급받은 ssh-key가 있는 폴더로 이동
/.ssh폴더아래 id_rsa(private key) 와 id_rsa.pub(public key)
해당 내용 copy해서
myComm C:\\Users\\onesixx
$ ssh-keygen -t rsa -b 4096
Generating public/private rsa key pair.
Enter file in which to save the key (C:\\Users\\onesixx/.ssh/id_rsa):
Enter passphrase (empty for no passphrase):
Enter same passphrase again:
Your identification has been saved in C:\\Users\\onesixx/.ssh/id_rsa.
Your public key has been saved in C:\\Users\\onesixx/.ssh/id_rsa.pub.
The key fingerprint is:
SHA256:y49WxhiGzPdJxxxxxxxxxxxxxxxxWFWDyEUZssU mycomm\\onesixx@SKCC21N00559
The key's randomart image is:
+---[RSA 4096]----+
|          ..=BO@%|
|           o*EB*X|
|     o .   + o++.|
|      + + . +oo  |
|       oS* o.o   |
|       ...*      |
|        oo       |
|        .o       |
|       .. .      |
+----[SHA256]-----+
'


$ cd Users\\onesixx


$ vi .\\.ssh\\id_rsa.pub

2. 발급된 ssh-key파일을 서버에 등록
way1>원격서버로 파일을 copy한후 paste
파일에 add, overwrite (not replace)
 $ scp -P 9001 ./.ssh/id_rsa.pub [email protected]:my_id_rsa.pub
 $ cat my_id_rsa.pub >> .ssh/authorized_keys
way2>원격서버의 .ssh/authorized_keys 파일에 paste한다.

3. config 파일에서 키파일을 인식하도록 설정
다시 로컬 환경(원격 서버가 아닌)에서 vscode를 실행시킨다.
F1
Remote-SSH: Connect to Host…
Configure SSH Hosts…를 실행
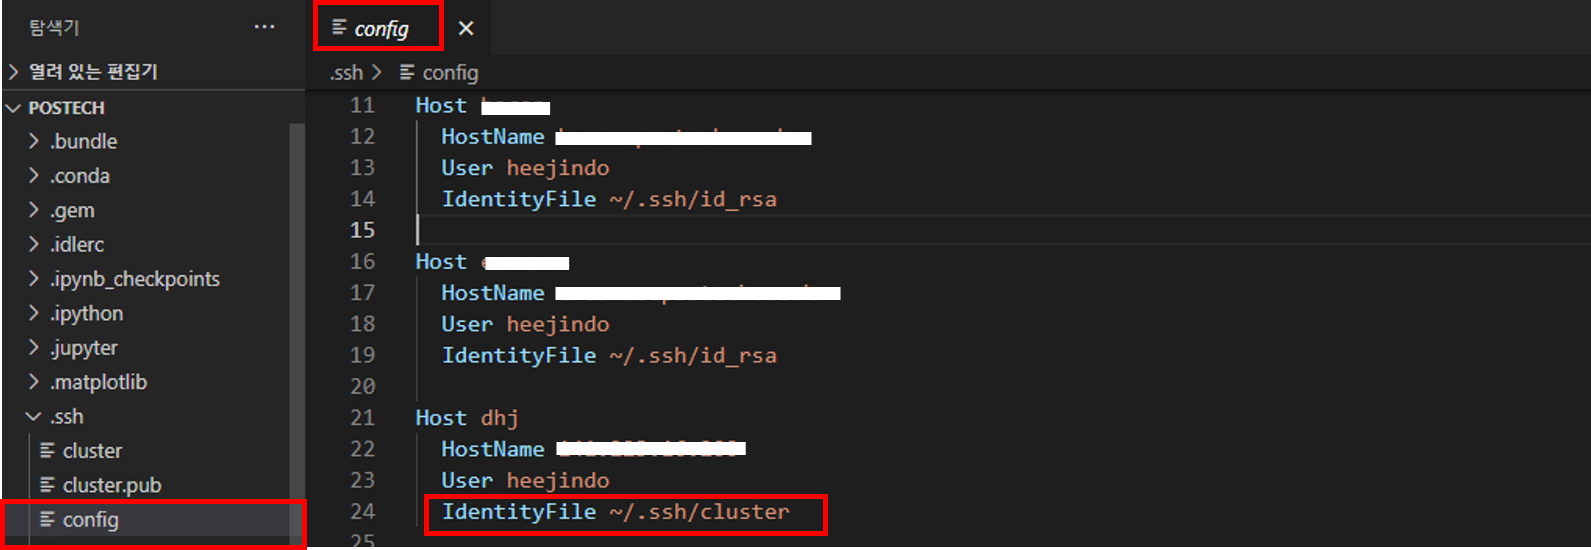
D:\Users\sixx\.ssh 폴더의 config 파일을 클릭
Config 파일에는 자신이 연결한 적이 있는 서버들에 대한 정보가 입력되어있는데,
자신이 key를 인식하고자 하는 서버 정보 아래에 IdentityFile ~/.ssh/id_rsa를 추가
(필자는 이미 모든 서버에 key등록을 해 둔 상태라 위 사진에서 IdentityFile이 입력되어져 있는 것임)
ForwardAgent yes

로컬에 저장된 id_rsa 파일을 인식해,
서버에 등록된 key 정보와 같으면 비밀번호 없이 해당 서버에 접속 할 수 있는 원리
python 설치
Extensions section. ( ⇧⌘X )
“python” extension 설치 & restart

Monokai pro
Python
pylance
python Extended
python type hint
Jupyter
docker
Remote – Container, SSH, …
Anaconda 환경 자동 연결
command pallet (Cmd+Shift+P )

Preference> Setting > Workspace

새 notebook 파일
- Cmd+Shift+P ( View > Command Palette (⇧⌘P))
- Python: Create Blank New Jupyter Notebook

테마 설정 및 일부 색상 변경
Monikai 테마 배경에
기존테마 색상 변경
Code > Setting > Settings…
Workbench> Appearance> Edit in setttings.json

"workbench.colorTheme": "Monokai",

"workbench.colorCustomizations": {
\t"tab.activeBackground": "#6A5ACD",
\t"activityBar.activeBackground": "#6A5ACD",
\t"panelTitle.activeBorder": "#6A5ACD",
    //"statusBarItem.activeBackground": "#6A5ACD",
    //"toolbar.activeBackground": "#6A5ACD"
}
font
D2Coding 서체 설치
https://github.com/naver/d2codingfont/releases 에서 code(D2Coding-Ver1.3.2-20180524.zip)를 다운받아,
압축해제후, D2 CodinAll폴더의 D2Coding-Ver1.3.2-20180524-all.ttc 를 더블클릭하여 열고,
Install Font 버튼 클릭
적용
vscode에서 code > Preferences > Settings 에서
Text Editor > Font > Font Family의 내용을
Menlo, Monaco, ‘Courier New’, monospace -> D2Coding 으로 변경
또는
Font Ligatures에서 Edit in setting.json을 클릭하여 직접 수정
    "editor.fontFamily": "D2Coding, Menlo, Monaco, 'Courier New', monospace",
    "editor.fontLigatures": null

//D2Coding
    "editor.fontFamily": "D2Coding",
    "editor.fontLigatures": true
폴더구조보기


Extension 오프라인 설치
https://haenny.tistory.com/329#
1. vsix 다운로드
vscode marketplace 접속 (Visual Studio Code 탭)
원하는 Extention의 상세페이지에서, 우측에 Download Extension을 클릭
visx 파일이 다운로드
2. VSCode 확장 프로그램 설치
Command Pallete… 클릭 (Ctrl + Shift + P) 에서 Install from vix
- 좌측 하단 → 설정(톱니바퀴 아이콘) 클릭
- Command Pallete… 클릭 (Ctrl + Shift + P)
- ‘Install from VSIX’ 검색 후 클릭
- 원하는 vsix 파일 (확장 프로그램 설치 파일) 선택
Extension
Teminal zoom
Monokai pro
Remote-ssh
Vim
Indent-Rainbow