samba
https://support.apple.com/ko-kr/HT204445
http://studyforus.tistory.com/226
http://crazia.tistory.com/
http://elementaryos.stackexchange.com/questions/3002/how-do-i-create-a-simple-smb-file-share
http://izne.ws/archive/2015/06/18/mount-samba-shares-permanently/
http://kkamagistory.tistory.com/228
SMB와 SAMBA
SMB (Server Message Block)
Window OS에서 (application layer에서 동작하는) File 또는 Printer의 공유를 위한 protocol.
cf. NetBios (TCP/IP 기반 Lan으로 연결된 네트웍내에 Windows OS간 통신) -> NetBEUI (by IBM) -> SMB에 통합 (by Microsoft)
cf. cifs (common internet file system) 인터넷지원이 가능한 SMB확장 protocol. (protocol 정의에 Unix업체도 참여)
SAMBA
Microsoft에서 변경한 SMB/CIFS 스펙을 공개하지 않아, 리버스 엔지니어링을 통해 Windows가 이외의 OS에서 사용가능하도록 만든 것
ex) Windows OS와 Unix계열OS
https://www.samba.org/
Linux의 경우, window os의 SMB 시스템/포트를 공유하기 위해, Samba Server를 추가적으로 설치해야함.
(OS X에서는 SMB를 사용할 수 없는 경우 AFP(Apple File Protocol)로 연결을 시도함)
– Command
1. Install samba server
$ sudo apt-get install samba samba-common
설치확인
$ dpkg -l | grep samba
ii  python-samba                                   2:4.3.11+dfsg-0ubuntu0.16.04.3                            amd64        Python bindings for Samba
ii  samba                                          2:4.3.11+dfsg-0ubuntu0.16.04.3                            amd64        SMB/CIFS file, print, and login server for Unix
ii  samba-common                                   2:4.3.11+dfsg-0ubuntu0.16.04.3                            all          common files used by both the Samba server and client
ii  samba-common-bin                               2:4.3.11+dfsg-0ubuntu0.16.04.3                            amd64        Samba common files used by both the server and the client
ii  samba-dsdb-modules                             2:4.3.11+dfsg-0ubuntu0.16.04.3                            amd64        Samba Directory Services Database
ii  samba-libs:amd64                               2:4.3.11+dfsg-0ubuntu0.16.04.3                            amd64        Samba core libraries
ii  samba-vfs-modules                              2:4.3.11+dfsg-0ubuntu0.16.04.3                            amd64        Samba Virtual FileSystem plugins
ii  vlc-plugin-samba                               2.2.4-6~ubuntu16.04.1~ppa1                                amd64        Samba plugin for VLC
2. samba 사용자 추가
$ sudo smbpasswd -a onesixx
New SMB password:
Retype new SMB password:
Added user
3. 설정
$ sudo vi /etc/samba/smb.conf
Samba설정파일은 크게 두 부분으로 구성되어 있습니다.
- [global] 항목은 Samba서버 전체에 대한 설정을 할 수 있습니다.
- [share] 항목은 개별적인 공유영역에 대한 설정을 할 수 있습니다.
해당 파일 끝에 아래 추가
[Sixx_Share]
path = /Users/onesixx/Sixx_Share
comment = MySharedFolder
valid users = onesixx
writable = yes
browsable = yes
create mask = 0644
directory mask=0755
설정 적용 : 설정후, samba 서버 Restart
$ sudo service smbd restart

$ sudo systemctl restart smbd.service
에러시 대응
Failed to restart samba.service: Unit samba.service is masked 메시지가 출력될 경우
$ service smbd restart
samba daemon이 시스템시작시 자동으로 시작되지 않으면,
$ sudo sysv-rc-conf samba on
– GUI Tool
1. Install samba server (GUI)
$ sudo apt-get install system-config-samba
실행
$ sudo system-config-samba
또는
$ gksu system-config-samba
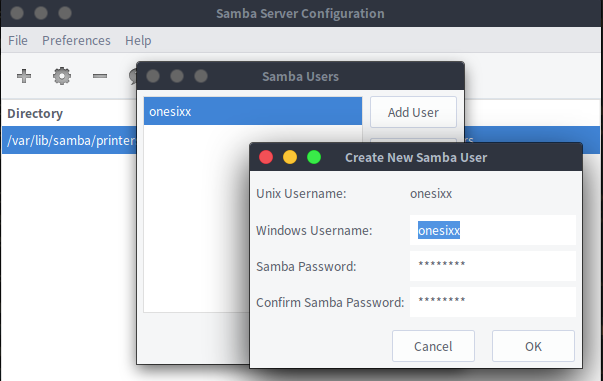
2. samba 사용자 추가
– 설정 > Samba 사용자
( Unix Username : 이미 생성된 리눅스 사용자 계정을 입력
Windows Username : Samba서버로 접근하는 Window 로그인 ID)
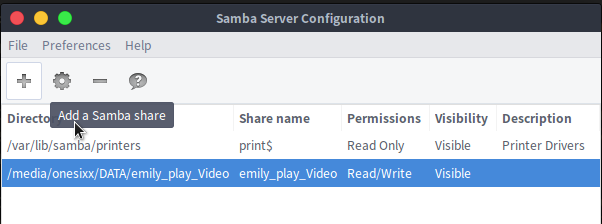
3. 설정
공유할 폴더 선택
사용자계정까지 설정을 완료후, Samba서버를 restart
$ sudo service smbd restart
에러시 대응
- 에러: SystemError: could not open configuration file `/etc/libuser.conf’: No such file or directory
$ sudo touch /etc/libuser.conf
- 에러: unable to locate theme engine in module_path adwaita
sudo apt install gnome-themes-standard
- 에러: Unable to locate image file in pixmap path
The workaround to eliminate the warnings/errors is by installing gtk2-engines-pixbuf
sudo apt-get install gtk2-engines-pixbuf
If you are using a 64-bit system, but using 32-bit software producing those warnings you might run:
sudo apt-get install gtk2-engines-pixbuf:i386
?????????????
AFP
1. Netatalk 를 설치한다.
$ sudo apt-get install netatalk
2. /etc/default/netatalk 를 열어서 다음과 같은 것을 찾아서 커멘트들을 해제해주거나 못 찾는 것은 추가해 줍니다.
ATALKD_RUN=no
PAPD_RUN=no
CNID_METAD_RUN=yes
AFPD_RUN=yes
TIMELORD_RUN=no
A2BOOT_RUN=no
3. netatalk 재시작
$ sudo /etc/init.d/netatalk restart
4. OSX 에서 ‘파인더(Finder)’ 를 실행 시키고 ‘이동’ -> ‘서버에 연결’ 을 선택하시고 서버의 주소를 입력하시면 바로 공유 폴더에 접속하는 것을 확인할 수가 있습니다.
Linux에서 window OS 네트웍크드라운 Mount하기
http://yybox.tistory.com/1
mount -t cifs <소스PC의폴더> <타켓폴더> -o username=<사용자명> , passwd=<암호>
mount -t cifs //192.168.000.00/sharedirectory /mnt -o username=user, passwd=password
– 192.168.xxx.xx 서버의 공유폴더 검색
smbclient -L 192.168.xxx.xx -U administrator
– auto mount
fstab 시작시 마운트
vi /etc/fstab
//192.168.000.00/sharedirectory /mnt cifs username=user, passwd=password 0 0
