Python GUI 프로그래밍 – PyQt5
https://wikidocs.net/book/2944
PyQt 기초
import sys
from PyQt5.QtWidgets import *

app = QApplication(sys.argv)   ###---1) QApplication 클래스의 인스턴스 생성 ---
                               # (sys파일내에 argv라는 리스트)

label = QLabel("Hello")        # bindingVar = Class("initialVal")
label.show()                   # Instance.method()
                               # QWidget: Must construct a QApplication before a QWidget

btn = QPushButton("GutenTag")    # 버튼 객체 생성
btn.show()

app.exec_()                    ###---2) 이벤트 루프 생성 ----------------------
                               # QApplication 인스턴스 생성하고 메서드만 호출

GUI 프로그램의 “기본 코드”
import sys
from PyQt5.QtWidgets import *

class MyWindow(QMainWindow):
    def __init__(self):
        super().__init__()

app = QApplication(sys.argv)   ###---1) QApplication 클래스의 인스턴스 생성 ---
window = MyWindow()
window.show()

app.exec_()                    ###---2) 이벤트 루프 생성 ----------------------
이벤트 처리 코드 :: Event with callback
일반적으로 클래스의 메서드는 User가 객체를 생성한 후 객체를 통해 메서드를 직접 호출했지만,
GUI 프로그래밍에서는 이벤트를 발생될 때, Event Loop가 해당 이벤트에 연결되어 있는 메서드를 호출해줍니다.

이처럼 User가 직접 메서드를 호출하는 것이 아니라,
이벤트 루프가 메서드를 호출하기 때문에 ‘콜백 함수’라고 부릅니다.
쌩짜
import sys
from PyQt5.QtWidgets import *
from PyQt5.QtGui import *
class MyWindow(QMainWindow):
def __init__(self):
super().__init__()
self.setGeometry(0,200, 300,400)
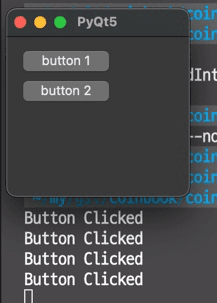
self.setWindowTitle("PyQt5")
self.setWindowIcon(QIcon('icon.png'))
btn = QPushButton("button 1", self)
btn.move(10,10)
btn.clicked.connect(self.btn_clicked)
btn2 = QPushButton("button 2", self)
btn2.move(10,40)
def btn_clicked(self):
print("Button Clicked")
app = QApplication(sys.argv) ###---1) QApplication 클래스의 인스턴스 생성 ---
window = MyWindow()
window.show()
app.exec_() ###---2) 이벤트 루프 생성 ----------------------
QT Desinger
import sys
from PyQt5.QtWidgets import *
from PyQt5  import uic

form_class = uic.loadUiType("basic_qt5.ui")[0]

class MyWindow(QMainWindow, form_class):
    def __init__(self):
        super().__init__()
        self.setupUi(self)


        self.pushButton.clicked.connect(self.btn_clicked)


    def btn_clicked(self):
        print("Button Clicked")

app = QApplication(sys.argv)   ###---1) QApplication 클래스의 인스턴스 생성 ---
window = MyWindow()
window.show()

app.exec_()                    ###---2) 이벤트 루프 생성 ----------------------
QPushButton에는 ‘clicked’라는 시그널이 있다. (QPushButton클래스의 인스턴스는 btn에 바인딩)
MySignal클래스에는 ‘signal1’이라는 시그널이 있다. (MySignal클래스의 인스턴스는 mysignal에 바인딩)
class MySignal(QObject):
    signal1 = pyqtSignal()

    def run(self):
        self.signal1.emit()


class MyWindow(QMainWindow):
    def __init__(self):
        super().__init__()

        mysignal = MySignal()
        mysignal.signal1.connect(self.signal1_emitted)
        mysignal.run()

    @pyqtSlot()
    def signal1_emitted(self):
        print("signal1 emitted")
PyQt의 시그널/슬롯을 이용하면 특정 시점에 어떤 클래스에서 다른 클래스로 데이터를 쉽게 보낼수 있음.
import sys
from PyQt5.QtWidgets import *
from PyQt5  import uic
from PyQt5.QtCore import *
import pykorbit

class MySignal(QObject):
    signal1 = pyqtSignal()
    signal2 = pyqtSignal(int, int)

    def run(self):
        self.signal1.emit()
        self.signal2.emit(1,2)

form_class = uic.loadUiType("basic_qt5.ui")[0]
class MyWindow(QMainWindow, form_class):
    def __init__(self):
        super().__init__()
        self.setupUi(self)

        mysignal = MySignal()
        mysignal.signal1.connect(self.signal1_emitted)
        mysignal.signal2.connect(self.signal2_emitted)
        mysignal.run()

    @pyqtSlot()
    def signal1_emitted(self):
        print("signal1 emitted")

    @pyqtSlot(int, int)
    def  signal2_emitted(self, arg1,arg2):
        print("signal2 emitted", arg1, arg2)

app = QApplication(sys.argv)   ###---1) QApplication 클래스의 인스턴스 생성 ---
window = MyWindow()
window.show()

app.exec_()                    ###---2) 이벤트 루프 생성 ----------------------
Dash PyQt5
https://stackoverflow.com/questions/51522463/use-dash-plot-ly-in-pyqt5-gui
import sys
import threading
from PyQt5 import QtWidgets

import dash
from dash import dcc
from dash import html

def run_dash(data, layout):
    app = dash.Dash()
    app.layout = html.Div(children=[
        html.H1(children='Hello Dash'),
        html.Div(children='''
            Dash: A web application framework for Python.
        '''),
        dcc.Graph(id='example-graph',
            figure={
                'data': data,
                'layout': layout
            })
        ])
    app.run_server(debug=False)

class MainWindow(QtWidgets.QMainWindow):
    pass

if __name__ == '__main__':
    data = [
        {'x': [1, 2, 3], 'y': [4, 1, 2], 'type': 'bar', 'name': 'SF'},
        {'x': [1, 2, 3], 'y': [2, 4, 5], 'type': 'bar', 'name': u'Montréal'},
    ]
    layout = {
        'title': 'Dash Data Visualization'
    }

    threading.Thread(target=run_dash, args=(data, layout), daemon=True).start()

    app = QtWidgets.QApplication(sys.argv)
    mainWin = MainWindow()
    mainWin.show()
sys.exit(app.exec_()) 