jupyter lab 설치
PythonShell인 REPL (Read-Evaluate-Print-Loop)을 사용
Ipython = pythonShell + 개선점 (Tab Completion, Code Highlighting, Shortcut, Magic Command 등)
==[Web Applicaiton, S/C]==> Jupyter Notebook
Jupyter Lab = Jupyter Notebook + 개선점(다중 탭 지원, 다양한 확장 기능…)
miniconda 설치
(가상환경에) Jupyterlab설치
(Base) ~$➜  conda activate sixxDL


(sixxDL) ~$➜  pip install jupyterlab
#$ conda install -c conda-forge jupyterlab
# 이미설치되어 있음
(sixxDL) ~$➜  conda list jupyter
# packages in environment at /Users/onesixx/Library/r-miniconda/envs/sixxDL:
#
# Name                    Version                   Build  Channel
jupyter-client            6.1.12                   pypi_0    pypi
jupyter-core              4.7.1                    pypi_0    pypi
jupyter-server            1.8.0                    pypi_0    pypi
jupyterlab                3.0.16                   pypi_0    pypi
jupyterlab-pygments       0.1.2                    pypi_0    pypi
jupyterlab-server         2.5.2                    pypi_0    pypi
실행
(base) ~$➜  conda activate sixxDL
(sixxDL) ~$➜  jupyter lab
Jupyter lab 설정 파일
~/.jupyter/ 아래 jupyter_lab_config.py 파일생성
~$➜  jupyter lab --generate-config
Writing default config to: /Users/onesixx/.jupyter/jupyter_lab_config.py

~$➜  subl /Users/onesixx/.jupyter/jupyter_lab_config.py
~$➜ jupyter lab --config=<원하는패스>
###### 외부 접속 허용 170
#------------------------------------------------------------------------------
# ServerApp(JupyterApp) configuration
#------------------------------------------------------------------------------
...
#  Takes precedence over allow_origin_pat.
c.ServerApp.allow_origin = '*'
#  Local IP addresses (such as 127.0.0.1 and ::1) are allowed as local, along
#  with hostnames configured in local_hostnames.
c.ServerApp.allow_remote_access = True
## Whether to allow the user to run the server as root.
c.ServerApp.allow_root = True

#------------------------------------------------------------------------------
# ServerApp(JupyterApp) configuration
#------------------------------------------------------------------------------
...

## Specify what command to use to invoke a web browser when starting the server.
#  If not specified, the default browser will be determined by the `webbrowser`
#  standard library module, which allows setting of the BROWSER environment
#  variable to override it.
# WHALE을 기본 브라우저로 사용하고 싶을때.
# c.ServerApp.browser = '/Applications/Whale.app/Contents/MacOS/Whale --app=%s'
c.ServerApp.browser = '/Applications/Whale.app/Contents/MacOS/Whale %s'

####### start whale http://onesixx.com
# /Applications/Whale.app/Contents/MacOS/Whale --app=http://onesixx.com
# "C:\Program Files (x86)\Naver\Naver Whale\Application\whale.exe"
# /Applications/Google\ Chrome.app/Contents/MacOS/Google\ Chrome --app=http://onesixx.com


###### ip:port 315
## The IP address the Jupyter server will listen on.
c.ServerApp.ip = 'localhost'
## The port the server will listen on (env: JUPYTER_PORT).
c.ServerApp.port = 7777

###### 브라우저 자동 구동 (default browser false) 377
## Whether to open in a browser after starting. The specific browser used is
#  platform dependent and determined by the python standard library `webbrowser`
#  module, unless it is overridden using the --browser (ServerApp.browser)
#  configuration option.
#c.ServerApp.open_browser = False

###### 토큰 입력
c.ServerApp.token = ''
#$ jupyter lab --ip=0.0.0.0 --port=7777 &
$ jupyter lab &
$ kill $(ps aux |grep jupyter | awk '{print $2}')
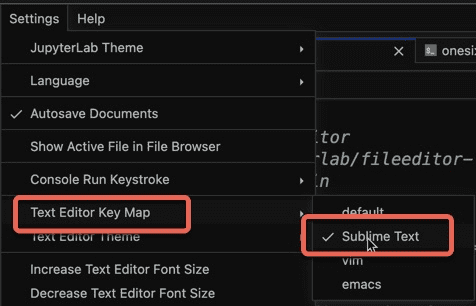
환경설정
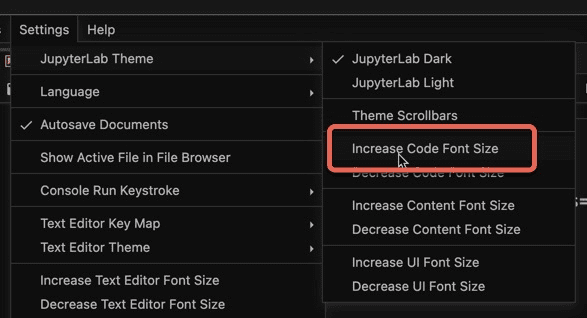
Code의 글자크기 변경
가상환경 선택
Jupyter lab에 가상환경 Kernel 연결하기
conda install ipykernel
python -m ipykernel install –user –name <가상환경명> [–display-name “VirtualEnvforPy”]
python -m ipykernel install --user --name Torch --display-name "Torch"
conda remove로 가상환경을 삭제해서 kernel은 남는다.
conda remove –name <커널명> –all
jupyter kernelspec list # 커널스펙목록에서 삭제한 커널명 확인
jupyter kernelspec uninstall <커널명>
유용한 Extension
Extension 기능은ㄴ nodejs가 설치되어 있어야 한다.
Mac
$ brew install node
Ubuntu
$ sudo apt install nodejs
$ sudo apt install npm
$ node -v
→ v10.19.0 (버전 확인)
$ sudo npm cache clean -f
→ cache 삭제
$ sudo npm install -g n
→ nodejs 버전 관리 플러그인 (n) 설치
$ sudo n lts
→ nodejs의 LTS 버전 (v14.17.0) 설치 , n stable, n latest 명령어로 원하는 버전 설치 가능
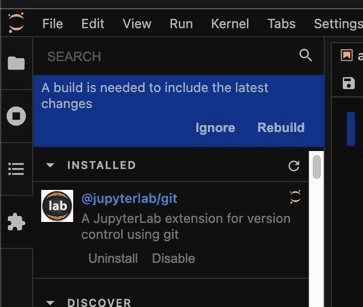
nodejs을 최신 버전으로 업데이트 후에는 Jupyter Lab Extenstion은 왼쪽 사이드바에 하단 Extension 아이콘을 선택 후 Extension 검색 메뉴를 통해서 설치할 수 있습니다.
Server Extension이 필요한 경우 서버에서 설치하면 구동이 가능합니다.
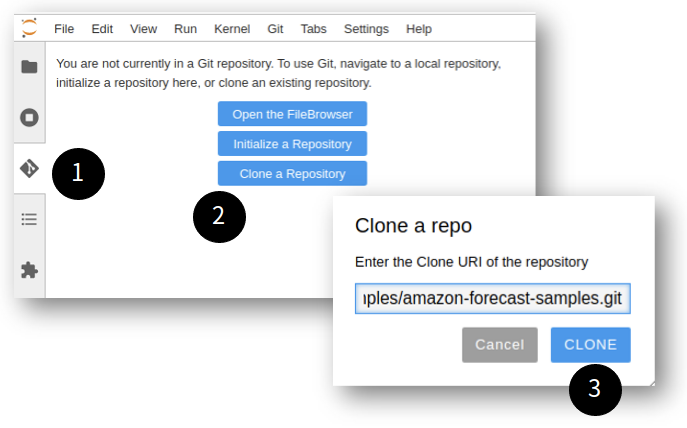
1. Git 연동 @jupyterlab/git
git 연동, branch관리 등. 왼쪽 사이드 메뉴에 Git 메뉴 추가됨
설치 명령어:
$ sudo pip3 install jupyterlab-git
(sixxDL) ~$➜ pip install –upgrade jupyterlab jupyterlab-git
(sixxDL) ~$➜ conda install -c conda-forge jupyterlab jupyterlab-git
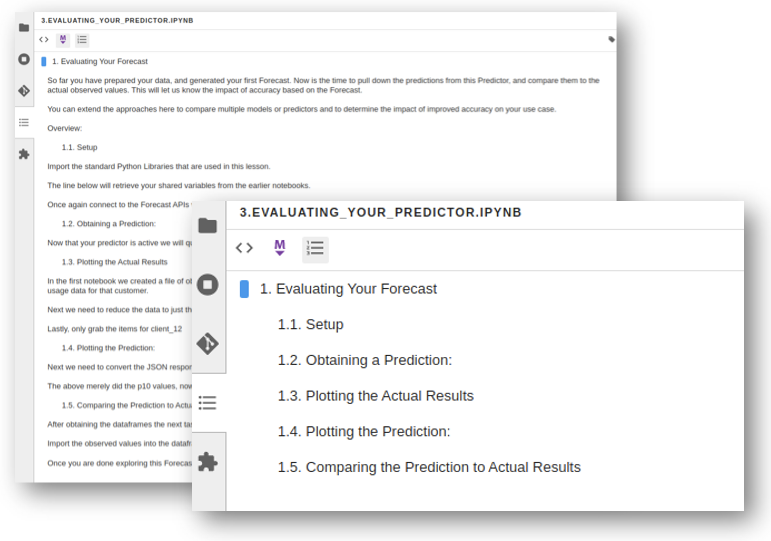
2. Table of content 생성 @jupyterlab/toc-extension
md 파일에 대한 목차 생성 JupyterLab < 3.0 이하 버전에서는 아래 extension 설치해야 하고, 3.0 이상 버전은 JupyterLab core에 이미 포함되어 있음
설치 명령어:
$ sudo jupyter labextension install @jupyterlab/toc
3. Go To Definition 기능 @krassowski/jupyterlab_go_to_definition
Alt + click to jump to a definition
Ctrl + Alt + B keyboard-only
설치 명령어
$ sudo jupyter labextension install @krassowski/jupyterlab_go_to_definition
4. Audo Complete @krassowski/jupyterlab-lsp
Code 자동 완성
설치 명령어:
$ sudo pip3 install jupyterlab-lsp
유용한 extension 소개
awesome jupyter (jupyter extensions 소개)
extension 설치방법
jupyterlab extension을 설치하기 위해서는 nodejs가 필수로 설치되어 있어야 한다.
참고 : How to Install Node.js and npm on Ubuntu 20.04 & 18.04
CLI를 통한 설치
jupyter labextension install [ extension 명]
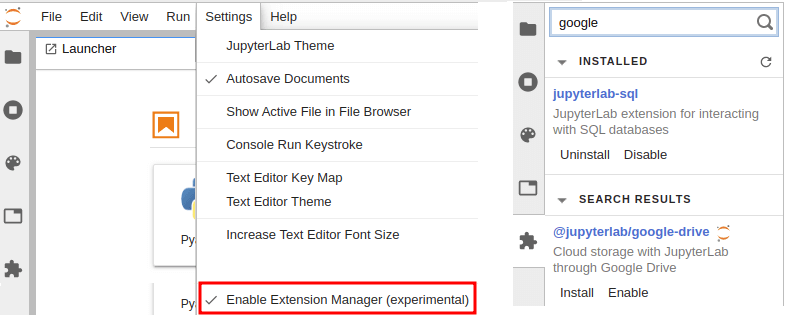
JupyterLab에서 설치
Settings 설정을 해주면, 원하는 extension을 검색해서 간단히 설치할 수 있다.
0. 일반적인 용도의 extension
| extension 명 | 설 명 |
|---|---|
| jupyter-widgets/jupyterlab-manager | ipywidget 실행을 위한 extension |
| jupyterlab/jupyterlab-toc | table of contents 기능을 위한 extension |
| krassowski/jupyterlab-go-to-definition | go to definition 기능을 위한 extension |
| dnanhkhoa/nb_black | black formatter 자동적용을 위한 extension |
| kiteco/jupyterlab-kite | Kite Autocomplete Extension for JupyterLab |
| hadim/jupyter-archive | 작업중인 폴더 다운로드(zip) 기능을 위한 extension |
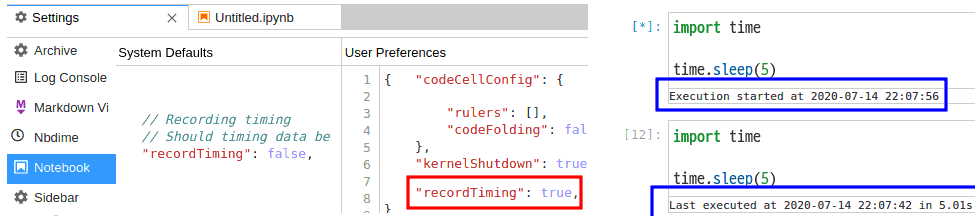
0-1. jupyterlab-execute-time
github.com/deshaw/jupyterlab-execute-time
1.0.0 기준
셀을 실행한 시간과 경과한 시간을 확인할 수 있다. 설치 후 settings에서 recordTiming을 true로 설정해야 한다.
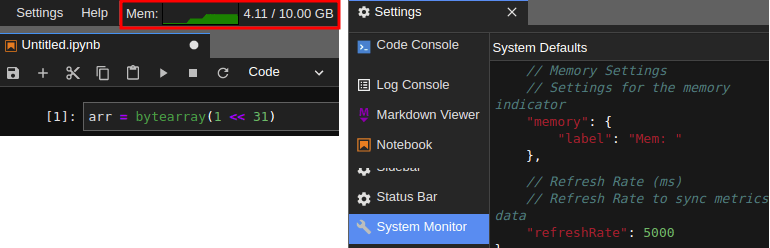
1. jupyterlab-system-monitor
github.com/jtpio/jupyterlab-system-monitor
0.4.1 기준
jupyterlab에서 사용하는 메모리 사용량을 확인할 수 있다. 그냥 설치만 하면 단순 사용량만 숫자로 확인 가능하다.
그래프를 보려면 메모리 사이즈 제한을 설정해야 한다. 현재, 실제로 작동하지는 않는다. 그냥 임의의 설정값일 뿐이다.
jupyter_notebook_config.py에 아래 부분을 추가하면 된다.
( config를 그동안 사용하지 않았다면 jupyter lab –generate-config로 먼저 생성한다. )
기본값으로 5초(5000ms)마다 한 번씩 업데이트 되는데 Settings에서 값을 변경할 수 있다.
#-----------------------------------------------------------
# NotebookApp(JupyterApp) configuration
#----------------------------------------------------------

c.NotebookApp.ResourceUseDisplay.mem_limit= (Size Of GB) *1024*1024*1024
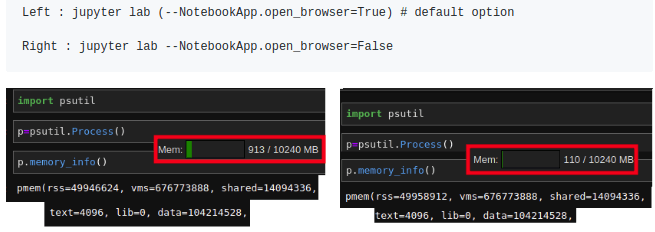
참고 : open_browser=True (default option) 를 사용할 경우, 브라우저 실행 메모리가 포함될 수 있다.
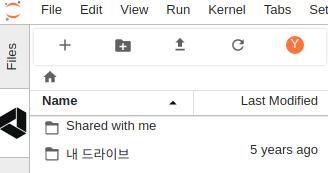
2. jupyterlab-googledrive
github.com/jupyterlab/jupyterlab-google-drive
1.0 기준
구글 드라이브에 파일 업로드 및 수정이 가능하도록 해준다. 노트북 파일을 클라우드에서 관리하는 용도로 유용하다.
아래 Post에서 설치 후 연동하는 방법을 확인할 수 있다.
Post – JupyterLab과 GoogleDrive 연동하기
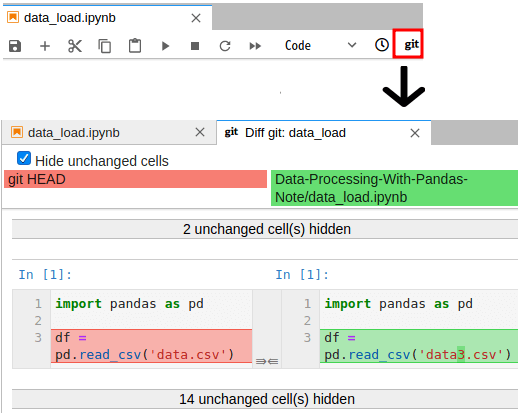
3. nbdime – Diff and Merge tool
Notebook 파일로 Diff and Merge 기능을 제공해준다.
2.0.0 기준
pip install nbdime
jupyter serverextension enable --py nbdime
jupyter labextension install nbdime-jupyterlab
- nbdiff 명령어로 수정한 내용을 확인 가능

- git repo를 사용하면 git의 정보와 현재 저장한 노트북을 비교 가능
참고 : Working with nbdime – in JupyterLab Quick Start Guide
4. jupyterlab-github
github.com/jupyterlab/jupyterlab-github
1.0 기준
github에 올린 노트북 파일을 참고하는 용도로 적합하다. github에 업로드 된 파일을 읽을 수 있다. 단, 수정하거나 업로드는 불가하다.
로컬 노트북으로 셀을 복사하고 붙여넣기는 가능하기 때문에 나름 유용하다.
USER 명/repo 명으로 검색 가능하다.

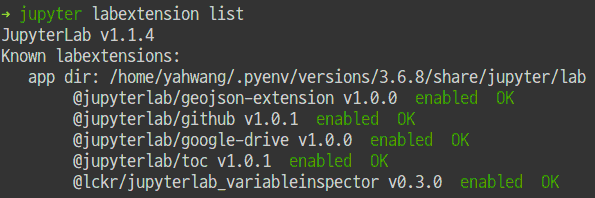
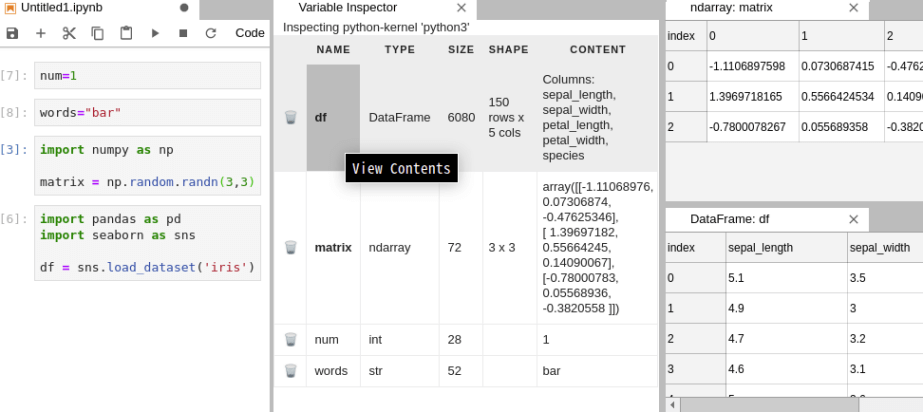
5. lckr/jupyterlab_variableinspector
github.com/lckr/jupyterlab-variableInspector
0.3 기준
jupyter labextension install @lckr/jupyterlab_variableinspector
RStudio처럼 inspector 기능을 구현하려고 하는 extension이다. 휴지통 아이콘으로 변수 삭제를 할 수도 있다.
Name을 클릭하면 array나 dataframe은 value를 테이블 형태로 확인할 수도 있다.
사용방법 : 노트북 파일 빈 공간에서 우클릭 후 Open Variable Inspector를 실행하면 새로 창이 나타난다.
6. pbugnion/jupyterlab-sql
github.com/pbugnion/jupyterlab-sql
0.3.1 기준

설치방법
pip install jupyterlab_sql
jupyter serverextension enable jupyterlab_sql --py --sys-prefix
jupyter lab build

# PostgreSQL 연결을 위한 psycopg2 설치
pip install psycopg2-binary

# MySQL 연결을 위한 pymysql 설치
pip install PyMySQL
pip install cryptography
설치 후 재실행하면 SQL 아이콘을 선택할 수 있고 연결할 DB 정보를 입력한다.
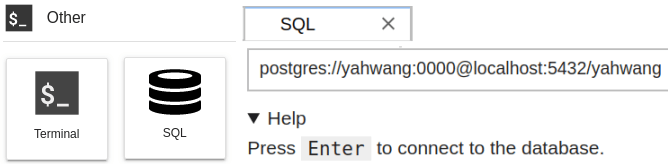
PostgreSQL - postgres://user:password@ip:port/database
MySQL - mysql+pymysql://user:password@ip:port/database
연결하면 DB의 테이블이 보이고 더블클릭하면 1000개까지의 row를 확인할 수있다.
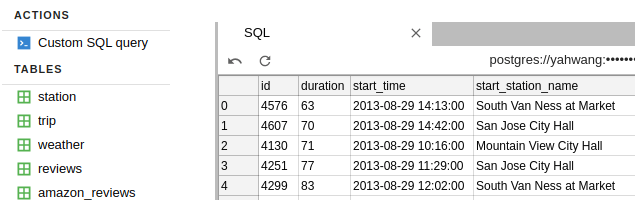
Custom SQL query를 클릭하여 쿼리문을 입력하면(Ctrl+Enter) 결과를 확인할 수 있다.
데이터 복사 등의 추가기능은 현재 없다.
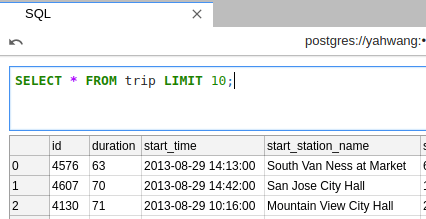
DB의 데이터를 간단히 확인할 수 있는 정도인 것 같다. 노트북 파일에서 활용되는 ipython-sql이 아직은 더 유용해보인다.
