reveal.js :: R Presentations
https://github.com/rstudio/revealjs
http://rmarkdown.rstudio.com/revealjs_presentation_format.html
https://support.rstudio.com/hc/en-us/articles/200486468-Authoring-R-Presentations
http://rmarkdown.rstudio.com/revealjs_presentation_format.html#installation
http://hakim.se/
http://lab.hakim.se/reveal-js/#/
revealjs를 이용한 RStudio의 web presentation
Overview
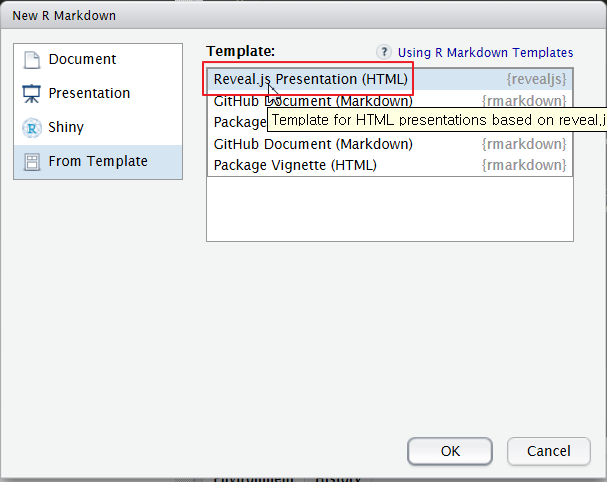
RStudio내의 reveal.js기반에 web Framework [ reveal.js : revealjs_presentation() ]
Rendering을 여러방법(R console, Terminal command-line) 중 RStudio 를 활용.
Display 모드에서,
- 전체 화면: F
- overview: O
Rendering을 여러방법(R console, Terminal command-line) 중 RStudio 를 활용.
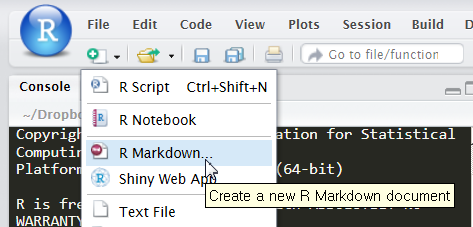
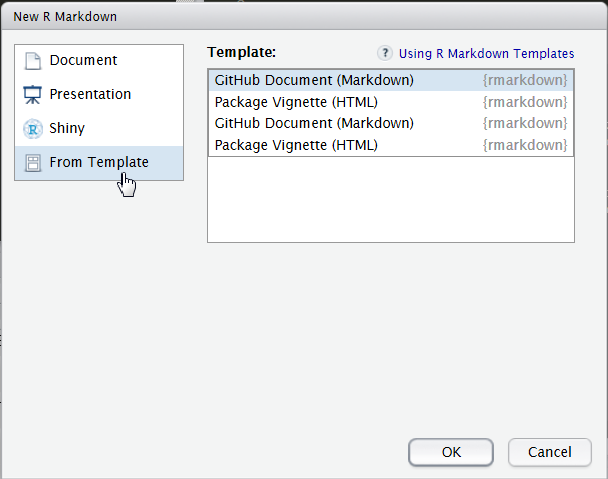
신규생성
New File -> R Presentation
install.packages("revealjs", type = "source")
Installing package into ‘~/R/x86_64-pc-linux-gnu-library/3.2’
(as ‘lib’ is unspecified)
https://cran.rstudio.com/src/contrib/revealjs_0.9.tar.gz
Resolving cran.rstudio.com ...
  0K .......... .......... .......... .......... ..........  2% 5.82M 0s
  ..........
  2200K .......... .......... .......... .......... .......   100% 14.0M=0.2s

* installing *source* package ‘revealjs’ ...
** package ‘revealjs’ successfully unpacked and MD5 sums checked
** R
** inst
** preparing package for lazy loading
** help
*** installing help indices
** building package indices
** testing if installed package can be loaded
* DONE (revealjs)

The downloaded source packages are in '/tmp/RtmpVdhQEy/downloaded_packages’
YAML
웹문서( HTML+CSS+Javascript) 의 resource을 지정해주는 형식
Slide Basics
section headings (H1)
=============
* 맨처음 Slide는 표지 (author, date… )
* 제목이 필요없을때는 (title: false)
Title Slide
====================================
author: onesixx
date: 2013.9
autosize: true
transition: rotate
transition-speed: slow
transition : none, linear(기본값), rotate, fade, zoom, concave 중 하나선택 , 개별 슬라이드마다 다르게 줄수 있다.
Rstudio Review에서는 transition은 확인할수 없고, 크롬같은 외부 브라우저로 확인 가능하다.
Caching
저장때마다, Knitr를 재실행해서 preview를 만들기 때문에 긴 계산의 경우 시간이 낭비된다.
cache examples 참조
enable cache : cache=TRUE
문서 전체에 caching 활성화하려면, 문서 맨 앞에 아래처럼 코드를 삽입한다.
```{r setup, include=FALSE}
opts_chunk$set(cache=TRUE)
```
캐시 삭제는 More메뉴 아래 Clear Knitr Cache 를 사용한다.
Hierarchy and Navigation
Slide Types
슬라이드 타입 : section, sub-section, prompt, alert (색깔, 폰트, 들여쓰기 등 의도에 따라 골라 사용한다. )
New Section
====================================
type: section

Prompt Slide
====================================
type: prompt
Incremental Display
incremental: true 를 사용하여
My Slide
====================================
incremental: true
Headers, paragraphs, blockquotes, code blocks, list items 등 구성요성가 차례대로 보여진다.
Slide Links
기본 markdown문법으로, id로 Slide명을 정해놓은 경우 Slide로 이동하는 hyperlink 생성
Slide 1
====================================
id: slide1

Slide 2
====================================
[Go to slide 1](#/slide1)
Opening Source Files
source 로 슬라이드가 보여질때마다 자동으로 source file 실행이가능하다.
My Slide
====================================
source: example.R
또한 소스코드중 일부 라인만 실행도 가능하다.
source: example.R 30
정규식을 통해 소스파일을 찾아 실행할수도 있다.
source: example.R /loading data/
Authoring Content
Formatted Text
Content 작성은 standard Markdown syntax 를 따른다.
- Markdown Basics
- Help에서 Markdown Quick Reference 검색
R Code Chunks
echo=FALSE : 코드없이 Output만
eval=FALSE : Output없이 코드만
Slide With Code
====================================
```{r}
summary(cars)
```
Two Column Layouts
슬라이드를 수직으로 2열(5:5)로 나눌때 ***
Two-Column Slide
====================================
First column
***
Second column
비율이 다르게 나눌때 left or right 필드 사용
Two-Column Slide
====================================
left: 70%
Customizing Fonts and Appearance
Specifying a Custom Font
By default R Presentations use the Lato font, however it’s also possible to customize the font used within a presentation using the font-family field of the first slide. For example:
My Presentation
========================================
author: John Doe
font-family: 'Helvetica'
The semantics of this are the same as for a CSS font-family (i.e. you can specify a comma separated list of alternate fonts).
Note that if you use the default Lato font your presentation is guaranteed to always display with this font (since it is embedded within the presentation). However, if you specify an alternate font that font must be available on the system where the presentation is displayed (otherwise a fallback font will be utilized).
You can also import web fonts from a custom URL using the font-import field. For example:
My Presentation
========================================
author: John Doe
font-import: http://fonts.googleapis.com/css?family=Risque
font-family: 'Risque'
Smaller Text
If you need smaller text for certain paragraphs, you can enclose text in the <small> tag. For example:
<small>This sentence will appear smaller.</small>
Using Custom CSS
Specifying a Stylesheet
You can use CSS to customize the display of individual slides or spans of text. If you create a stylesheet within the same directory as your presentation that has the same base filename as your presentation it will be automatically imported. For example, if your presentation file is MyPresentation.Rproj then the file MyPresentation.css will be imported if it exists.
You can also explicitly specify a stylesheet file using the css field on the title slide. For example:
My Presentation
===================================
author: John Doe
css: custom.css
Finally, if you prefer to include styles right within the presentation source file you can also place them at the top of the source above the title slide (any style tags included there will automatically be appended to the head element).
Applying Styles
You can apply classes defined in your CSS file to individual slides by adding a classfield to the slide. For example:
My Slide
===================================
class: illustration
You can apply classes defined in your CSS file to spans of text by using a span tag. For example:
My Slide
==================================
<span class="emphasized">Pay attention to this!</span>
If you have a style that you need to apply to many spans of text, you might also consider overriding the appearance of the (infrequenly used) overstrike markdown syntax. To do this you’d create a style for the del tag and then adorn the spans of text you want to format with the ~~overstrike~~ delimiters.
To do this, you need to also include some additional scopes in the CSS definition. For example, here is some CSS to specify red text for the del tag:
.reveal section del {
  color: red;
}
Now the following text will be displayed red:
~~this text will be red~~
Overriding Default Element Styles
You’ll note from the syntax above that we prefaced the specification of the del element with .reveal section. These additional scopes are necessary to ensure that the default slide deck CSS is properly overridden. For example, to change the default text color in paragraphs to blue you’d use:
.reveal section p {
  color: blue;
}
Custom Slide Types
The default slide types of section, sub-section, prompt, and alert provide custom background colors and other styles on a per slide type basis. Slides are designated to be of a certain type using the type field. You can create a custom slide type by providing the appropriately scoped CSS. For example, here is the CSS for a custom slide type named exclaim that sets it’s background to black and foreground text to white.
.exclaim .reveal .state-background {
  background: black;
}

.exclaim .reveal h1,
.exclaim .reveal h2,
.exclaim .reveal p {
  color: white;
}
Note that the use of .state-background is necessary to properly integrate with the default slide deck’s DOM structure.
You can then designate a slide to be of this type using the following syntax:
My Exclamation
========================================
type: exclaim
You can typically also accomplish per-slide type appearance customization using theclass field described above. However, the only way to customize the background color (or image) of a slide is to define a custom type
Displaying and Distributing Presentations
Displaying Presentations
R Presentations can be displayed in one of two ways:
- Inline inside the RStudio IDE
- In an external web browser
Inline Display
You can display your presentation inside the RStudio IDE by clicking the Preview icon at the top of the editor.

This displays the presentation within a pane in the top right corner of the IDE. From within the presentation pane you can also click the Zoom button on the toolbar to have the presentation occupy the full size of the IDE.
The advantage of this approach is that you can fluidly switch between slides and demonstrations, and even when doing demonstrations the slides are still visible for context. You can also use the source command (described in the Slide Transitions and Navigation article) to synchronize your presentation with source files that contain code you’d like to highlight or demonstrate.
External Display
You can also display your presentation in an external web browser (Chrome, Firefox, Internet Explorer and Safari are supported). To do this you invoke the More -> View in Browser command from the presentation toolbar.

There are several advantages to external display:
- Slide transitions are animated
- You can go into fullscreen mode by pressing the F key
- You can see a navigable overview of your slides by pressing the O key.
Presentation Size Options
All presentations have a “normal” size which reflects the maximum size they can be scaled to as well as the aspect ratio they are expected to be displayed at. When displayed at alternate sizes the presentation is automatically scaled to ensure the content fits on any given display.
The default size for R presentations is a width of 960 pixels and a height of 700 pixels. This size will render coherently on almost all laptop and projector screens so in most cases should not be changed. However, if you have a non-standard aspect ratio or want to use more pixels, you can specify an alternate width and height as follows:
My Presentation
============================================
author: John Doe
width: 1440
height: 900
If you intend to display your presentation principally within the RStudio IDE you should also consider the autosize option. For example:
My Presentation
============================================
author: John Doe
autosize: true
This autosize option automatically adapts the size of the presentation to the size of the current pane it is being displayed in. This is especially helpful if you expect users to be viewing your presentation within the RStudio preview pane, which will have widely varying aspect ratios depending on the user’s configuration.
Distributing Presentations
Saving as a Standalone Web Page
You can distribute R Presentations to other users by saving them as a standalone web page. To do this you invoke the More -> Save As Web Page command from the presentation toolbar.
Presentations saved in this manner can be replayed within any web browser, and are entirely standalone (i.e. they require neither RStudio nor the original presentation source files). They also do not require an internet connection (unless a font-import has been specified).
One final note: if a presentation makes use of MathJax for LaTeX equations, then the files required by MathJax are copied to a folder that needs to be distributed along with the presentation HTML file. For example, if the saved presentation is namedMyPresentation.html then the directory MyPresentation_files contains the MathJax supporting files.
Publishing to RPubs
Presentations can also be published to the web using RPubs. To do this you invoke theMore -> Publish to RPubs command from the presentation toolbar. Note that all documents published to RPubs are publicly visible, so you should only publish presentations that you wish to share publicly.
