install LEMP on Ubuntu
https://www.digitalocean.com/community/tutorials/how-to-install-linux-nginx-mysql-php-lemp-stack-in-ubuntu-16-04
https://www.digitalocean.com/community/tutorials/how-to-install-wordpress-with-lemp-on-ubuntu-16-04
https://blog.lael.be/post/73
How To Install LEMP stack(Linux, Nginx, MySQL, PHP ()
ubuntu 현재 버전 확인
리눅스 버전 확인
⇒ uname -a
Linux sixxEOS 4.4.0-75-generic #96-Ubuntu SMP Thu Apr 20 09:56:33 UTC 2017 x86_64 x86_64 x86_64 GNU/Linux
Ubuntu 버전확인
⇒ cat /etc/issue
elementary OS Loki \n \l
⇒  lsb_release -a
No LSB modules are available.
Distributor ID:	elementary
Description:	elementary OS 0.4 Loki
Release:	0.4
Codename:	loki
하드용량 확인
⇒  df -h
Filesystem                 Size  Used Avail Use% Mounted on
udev                       3.9G     0  3.9G   0% /dev
tmpfs                      795M   30M  765M   4% /run
/dev/sda1                  158G   64G   86G  43% /
tmpfs                      3.9G  118M  3.8G   3% /dev/shm
tmpfs                      5.0M  4.0K  5.0M   1% /run/lock
tmpfs                      3.9G     0  3.9G   0% /sys/fs/cgroup
/dev/sdb2                  2.8T  2.3T  446G  85% /media/onesixx/DATA
//192.168.1.1/RT_DOC/       60G  208M   56G   1% /media/RT_DOC
//192.168.1.1/Torrent_wa/  118G   29G   84G  26% /media/Torrent_wa
//192.168.1.1/RT_Video/    118G   29G   84G  26% /media/RT_Video
tmpfs                      795M   68K  794M   1% /run/user/1001
메모리 확인
⇒  free -m
              total        used        free      shared  buff/cache   available
Mem:           7940        4108         137         190        3694        3287
Swap:          8149          10        8139
Install Web Server : Nginx
apt관리자를 이용하여 간단히 설치한다.
sudo apt-get update

sudo apt-get install nginx
On Ubuntu 16.04, Nginx is configured to start running upon installation.
ufw 에 등록 (Optional)
firewall인 ufw가 동작하고 있다면, Nginx가 접속할수 있도록 설정해야한다.
설치여부확인
⇒  sudo ufw status
Status: inactive
설정
⇒  sudo ufw allow 'Nginx HTTP'
Rules updated
Rules updated (v6)
…
⇒ ip addr show eth0 | grep inet | awk '{ print $2; }' | sed 's/\/.*$//'
⇒ curl -4 icanhazip.com
…..
Install DBMS : MySQL
간단하게
sudo apt-get install mysql-server
root 사용자 암호를 설정한다.
설정
간단한 security script를 실행한다. (설정의 보안을 보완해준다.)
sudo mysql_secure_installation
Step 3: Install PHP for Processing
Nginx 가 PHP requests 를 processing할수 있도록 php-fpm (“fastCGI process manager) 설치한다.
또한 MySQL과 communication할수 있도록 관련 모듈도 설치한다.
sudo apt-get install php-fpm php-mysql
기본적으로 7버전이 설치된다.
Configure the PHP Processor
보안 설정
⇒ sudo vi /etc/php/7.0/fpm/php.ini
cgi.fix_pathinfo=0
설정후 php restart
⇒ sudo systemctl restart php7.0-fpm
Configure Nginx to Use the PHP Processor
Now, we have all of the required components installed. The only configuration change we still need is to tell Nginx to use our PHP processor for dynamic content.
We do this on the server block level (server blocks are similar to Apache’s virtual hosts). Open the default Nginx server block configuration file by typing:
sudo vi /etc/nginx/sites-available/default
index.php추가
server_name 에 도메인이나 IP추가
	index index.php index.html index.htm index.nginx-debian.html;

	server_name 서버도메인이나 아이피;
    location ~ \.php$ {
        include snippets/fastcgi-php.conf;
        fastcgi_pass unix:/run/php/php7.0-fpm.sock;
    }

    location ~ /\.ht {
        deny all;
    }
설정후 확인
⇒  sudo nginx -t
nginx: the configuration file /etc/nginx/nginx.conf syntax is ok
nginx: configuration file /etc/nginx/nginx.conf test is successful
NginX reload
⇒ sudo systemctl reload nginx
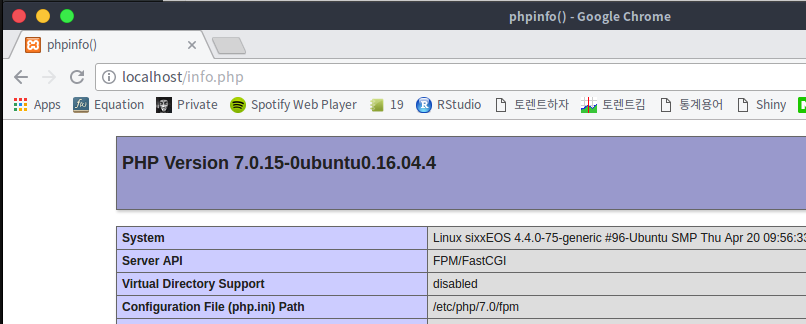
Step 5: Create a PHP File to Test Configuration
NginX가 php를 잘 처리하는지 확인
새파일을 만들고, phpinfo()가 잘 동작하는지 확인한다.
sudo vi /var/www/html/info.php
sudo rm /var/www/html/info.php
추가 phpAdmin설치
sudo apt-get install phpmyadmin
location /phpmyadmin {
    root /usr/share/;
    index index.php index.html index.htm;
    location ~ ^/phpmyadmin/(.+\.php)$ {
    	try_files $uri =404;
      fastcgi_pass unix:/var/run/php/php7.0-fpm.sock;
      include fastcgi_params;
      fastcgi_param SCRIPT_FILENAME $document_root$fastcgi_script_name;
		}
    location ~* ^/phpmyadmin/(.+\.(jpg|jpeg|gif|css|png|js|ico|html|xml|txt))$ {
      root /usr/share/;
    }
  }
적용
sudo systemctl reload nginx
